Fine-Tuning ModernBERT For Classification Tasks on Modal

Intro

First go and read the ModernBert blog post announcement here. If you are interested I wrote a little about transformers (encoders and decoders) in my previous blog posts here and here. I also have written previously about using Modal here and here and here.

Encoder Models Generate Embedding Representations

This section gives a very quick rundown on how encoder models encode text into embeddings.


from transformers import AutoModel, AutoTokenizer

model_id = "answerdotai/ModernBERT-base"
tokenizer = AutoTokenizer.from_pretrained(model_id)
model = AutoModel.from_pretrained(model_id)
model
/Users/christopher/personal_projects/DrChrisLevy.github.io/posts/modern_bert/env/lib/python3.11/site-packages/tqdm/auto.py:21: TqdmWarning: IProgress not found. Please update jupyter and ipywidgets. See https://ipywidgets.readthedocs.io/en/stable/user_install.html
  from .autonotebook import tqdm as notebook_tqdm
ModernBertModel(
  (embeddings): ModernBertEmbeddings(
    (tok_embeddings): Embedding(50368, 768, padding_idx=50283)
    (norm): LayerNorm((768,), eps=1e-05, elementwise_affine=True)
    (drop): Dropout(p=0.0, inplace=False)
  )
  (layers): ModuleList(
    (0): ModernBertEncoderLayer(
      (attn_norm): Identity()
      (attn): ModernBertAttention(
        (Wqkv): Linear(in_features=768, out_features=2304, bias=False)
        (rotary_emb): ModernBertRotaryEmbedding()
        (Wo): Linear(in_features=768, out_features=768, bias=False)
        (out_drop): Identity()
      )
      (mlp_norm): LayerNorm((768,), eps=1e-05, elementwise_affine=True)
      (mlp): ModernBertMLP(
        (Wi): Linear(in_features=768, out_features=2304, bias=False)
        (act): GELUActivation()
        (drop): Dropout(p=0.0, inplace=False)
        (Wo): Linear(in_features=1152, out_features=768, bias=False)
      )
    )
    (1-21): 21 x ModernBertEncoderLayer(
      (attn_norm): LayerNorm((768,), eps=1e-05, elementwise_affine=True)
      (attn): ModernBertAttention(
        (Wqkv): Linear(in_features=768, out_features=2304, bias=False)
        (rotary_emb): ModernBertRotaryEmbedding()
        (Wo): Linear(in_features=768, out_features=768, bias=False)
        (out_drop): Identity()
      )
      (mlp_norm): LayerNorm((768,), eps=1e-05, elementwise_affine=True)
      (mlp): ModernBertMLP(
        (Wi): Linear(in_features=768, out_features=2304, bias=False)
        (act): GELUActivation()
        (drop): Dropout(p=0.0, inplace=False)
        (Wo): Linear(in_features=1152, out_features=768, bias=False)
      )
    )
  )
  (final_norm): LayerNorm((768,), eps=1e-05, elementwise_affine=True)
)
text = "The capital of Nova Scotia is Halifax."
inputs = tokenizer(text, return_tensors="pt")
inputs
{'input_ids': tensor([[50281,   510,  5347,   273, 30947, 47138,   310, 14449, 41653,    15,
         50282]]), 'attention_mask': tensor([[1, 1, 1, 1, 1, 1, 1, 1, 1, 1, 1]])}
# Get embeddings
outputs = model(**inputs, output_hidden_states=True)
outputs.keys()
odict_keys(['last_hidden_state', 'hidden_states'])
# Tuple containing outputs from every layer in the model
print(len(outputs.hidden_states))
set([x.shape for x in outputs.hidden_states])
23
{torch.Size([1, 11, 768])}
# last_hidden_state
# Single tensor representing the final layer's output
# [batch_size, sequence_length, hidden_size]
outputs.last_hidden_state.shape
torch.Size([1, 11, 768])
outputs.last_hidden_state
tensor([[[ 3.9541e-01, -1.1135e+00, -9.1821e-01,  ..., -4.2644e-01,
           2.0316e-01, -7.5940e-01],
         [ 1.2727e-01,  6.0307e-02,  2.4341e-01,  ...,  1.3519e-01,
          -1.0590e-01,  9.5566e-02],
         [ 3.2714e-01, -1.3615e+00, -8.6864e-01,  ...,  5.3308e-01,
           1.4498e+00,  1.4891e-01],
         ...,
         [-2.8325e-02, -8.1840e-01, -1.1389e-01,  ...,  3.3296e-01,
          -5.4001e-01, -2.0064e-01],
         [-1.3851e+00,  1.5134e-01, -8.1608e-01,  ..., -1.4898e+00,
           2.8013e-01,  1.3483e+00],
         [ 2.5279e-01, -6.3874e-02,  7.7065e-02,  ...,  5.3266e-04,
          -5.2192e-03, -1.5917e-01]]], grad_fn=)

The reason we get an embedding for each token (11 in this example) is because BERT ( ModernBERT) are contextual embedding models, meaning they create representations that capture each token's meaning based on its context in the sentence. Each token gets its own 768-dimensional embedding vector.

for position in range(len(inputs.input_ids[0])):
    token_id = inputs.input_ids[0][position]
    decoded_token = tokenizer.decode([token_id])
    embedding = outputs.last_hidden_state[0][position]
    print(f"Position {position}:")
    print(f"Input Token ID: {token_id}")
    print(f"Input Token: '{decoded_token}'")
    print(f"Embedding Shape: {embedding.shape}")
    print("-" * 50)
Position 0:
Input Token ID: 50281
Input Token: '[CLS]'
Embedding Shape: torch.Size([768])
--------------------------------------------------
Position 1:
Input Token ID: 510
Input Token: 'The'
Embedding Shape: torch.Size([768])
--------------------------------------------------
Position 2:
Input Token ID: 5347
Input Token: ' capital'
Embedding Shape: torch.Size([768])
--------------------------------------------------
Position 3:
Input Token ID: 273
Input Token: ' of'
Embedding Shape: torch.Size([768])
--------------------------------------------------
Position 4:
Input Token ID: 30947
Input Token: ' Nova'
Embedding Shape: torch.Size([768])
--------------------------------------------------
Position 5:
Input Token ID: 47138
Input Token: ' Scotia'
Embedding Shape: torch.Size([768])
--------------------------------------------------
Position 6:
Input Token ID: 310
Input Token: ' is'
Embedding Shape: torch.Size([768])
--------------------------------------------------
Position 7:
Input Token ID: 14449
Input Token: ' Hal'
Embedding Shape: torch.Size([768])
--------------------------------------------------
Position 8:
Input Token ID: 41653
Input Token: 'ifax'
Embedding Shape: torch.Size([768])
--------------------------------------------------
Position 9:
Input Token ID: 15
Input Token: '.'
Embedding Shape: torch.Size([768])
--------------------------------------------------
Position 10:
Input Token ID: 50282
Input Token: '[SEP]'
Embedding Shape: torch.Size([768])
--------------------------------------------------

For downstream tasks with BERT-like models (including ModernBERT), there are typically two main approaches for generating a single embedding for the entire input text:

  1. [CLS] Token Embedding (Most Common)
# Get the [CLS] token embedding (first token, index 0)
cls_embedding = outputs.last_hidden_state[0][0]  # Shape: [768]
cls_embedding.shape
torch.Size([768])
  1. Mean Pooling (Alternative Approach)
# Mean pooling - take average of all tokens
mean_embedding = outputs.last_hidden_state[0].mean(dim=0)  # Shape: [768]
mean_embedding.shape
torch.Size([768])

The [CLS] token is specifically designed to capture sentence-level information and is most commonly used for classification tasks. This is because BERT models are trained to use this token to aggregate information from the entire sequence.

Fine-Tuning ModernBERT for Classification

When I first learned about fine-tuning transformer encoder models for classification tasks, my favorite resource was the book Natural Language Processing with Transformers: Building Language Applications with Hugging Face. It's still relevant and a great resource. In particular, checkout Chapter 2 which walks through classification tasks. In that chapter the authors first train a simple classifier on top of the [CLS] token embeddings. In that case the model is frozen and only used as a feature extractor. The other approach is to fine-tune the entire model together with a classification head. It's this latter approach that I'll show you how to do here.

Create a Modal Account

Setup the Environment

python3 -m venv env
source env/bin/activate
pip install modal dotenv
modal setup
  • Place your wandb api key in a .env file like this: WANDB_API_KEY=<>
  • create the filetrainer.py and place it at the root of your project folder alongside the .env file. The full code is below but you can also find it here.

Training Code

Here is all the code for the trainer.py file.

  • At the beginning of the file you can adjust the dataset, model, learning rate, batch size, epochs, class labels, column names, etc.
    • It's expected to use a Hugging Face dataset and it's expected that you will have to change these variables based on the dataset you are using.
    • You can also make edits anywhere else in the code as well but when you are first starting out it's best to keep the code simple and only make changes to the variables at the beginning of the file.
  • When you run modal run trainer.py it will execute the code within the function main().
    • By default it trains a model and then evaluates it on the validation split
    • You can do whatever else you want here in the main() function. For example, you could comment out the training logic and just run an evaluation on some checkpoint.
  • There are two main modal functions which each run in their own container. See the functions decorated with @modal.method(), which are train_model and eval_model.
  • If you want to run different training runs or evaluation runs just edit the file and kick off the jobs by executing modal run trainer.py from the command line. Remember modal will take care of spinning up the containers and running the code!
  • You can use the command modal run --detach trainer.pywhich lets the app continue running even if your client disconnects.
  • In either case you will see live logs directly in your local terminal, even though the containers are running in the cloud.
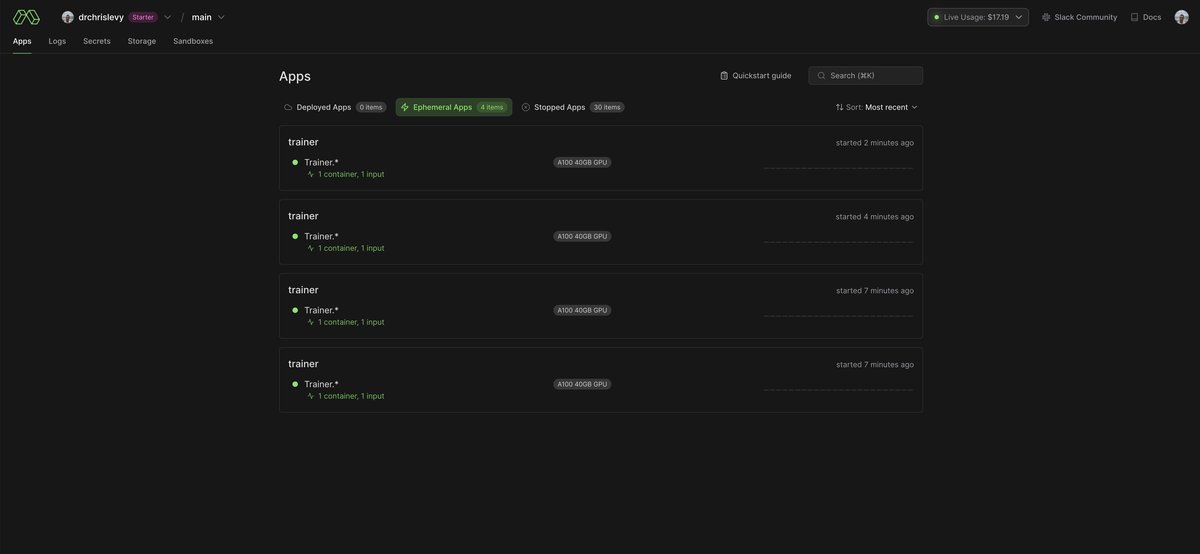
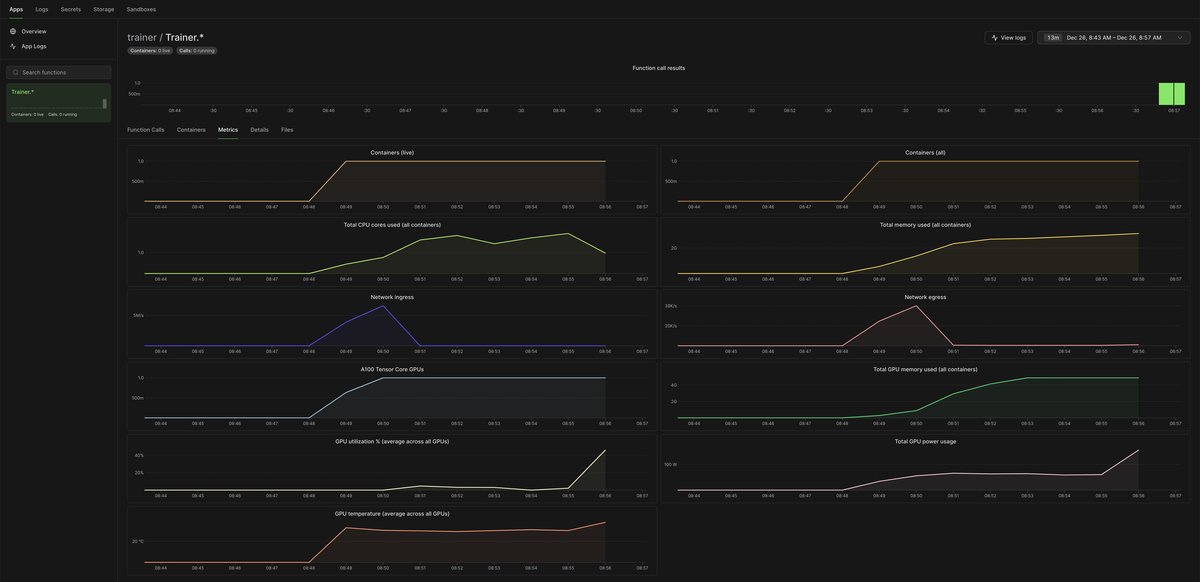
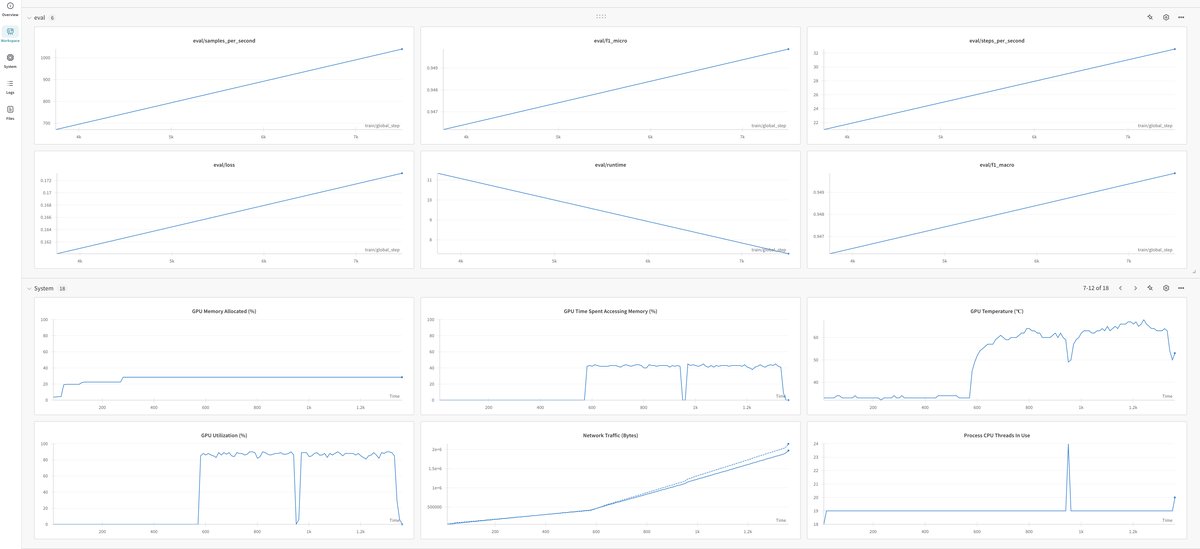
  • You can also follow along with logs and container metrics in the Modal UI dashboard.
  • You can also see the wandb outputs at https://wandb.ai/home
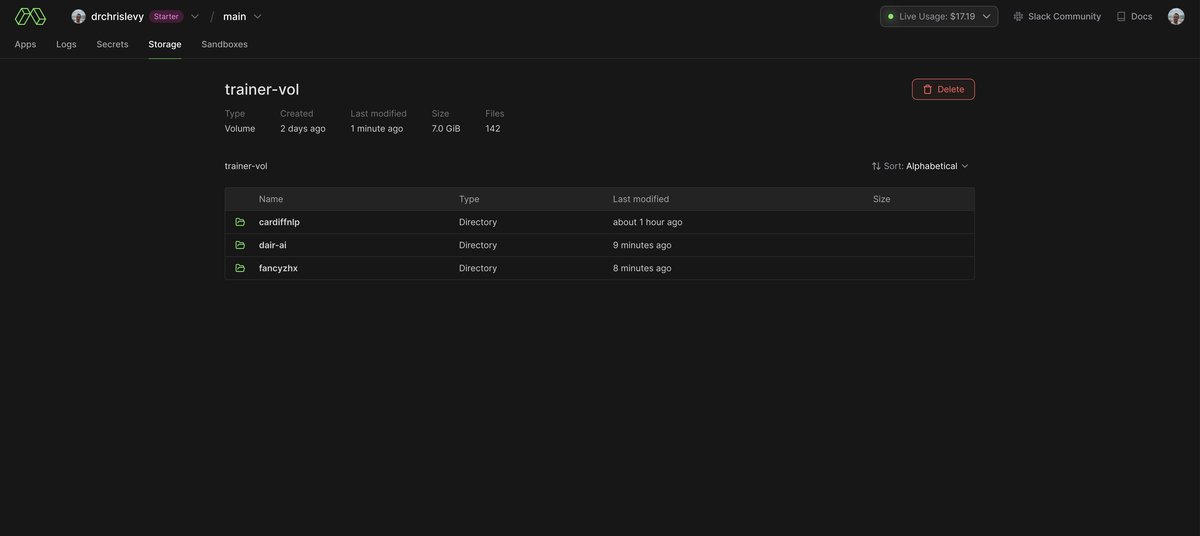
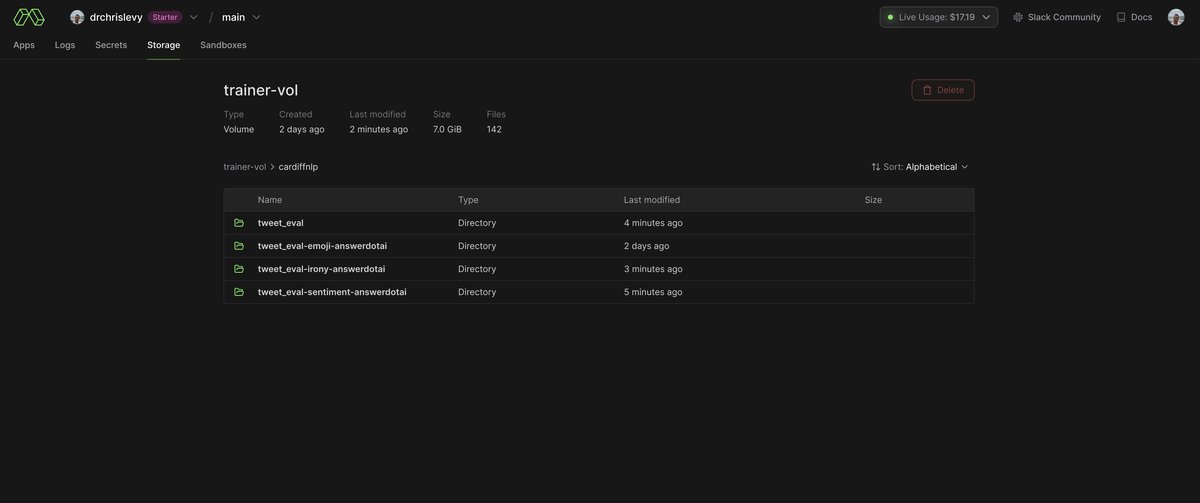
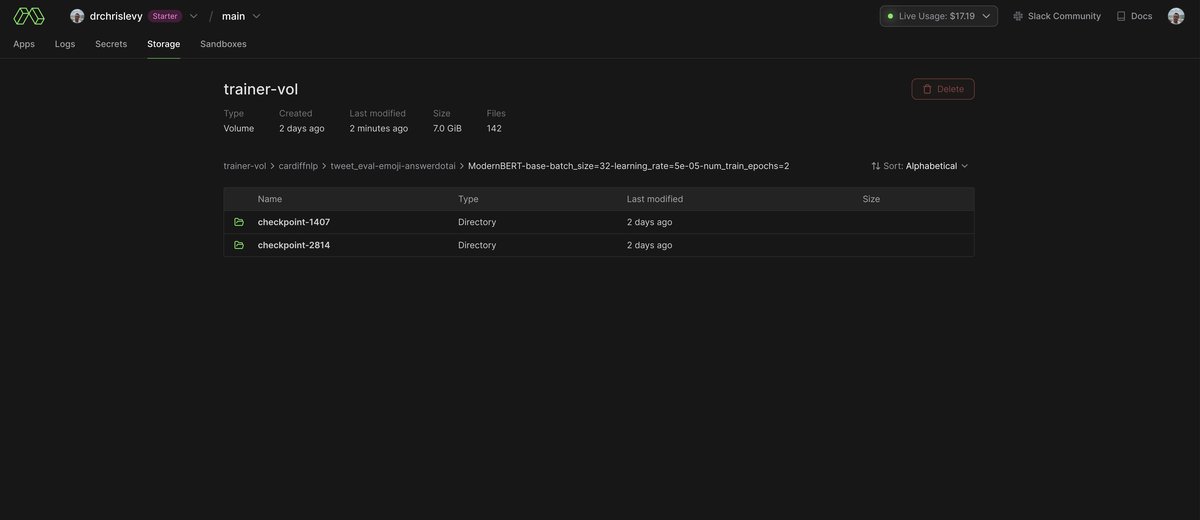
  • All the datasets and models are stored in the Modal volumes. You can see them in the Modal UI dashboard.

Here are is the trainer.py file. You can also find it here on github.

# ruff: noqa
import os
import shutil

import modal
from dotenv import load_dotenv
from modal import Image, build, enter

# ---------------------------------- SETUP BEGIN ----------------------------------#
env_file = ".env"  # path to local env file with wandb api key WANDB_API_KEY=<>
ds_name = "dair-ai/emotion"  # name of the Hugging Face dataset to use
ds_name_config = None  # for hugging face datasets that have multiple config instances. For example cardiffnlp/tweet_eval
train_split = "train"  # name of the tain split in the dataset
validation_split = "validation"  # name of the validation split in the dataset
test_split = "test"  # name of the test split in the dataset
# define the labels for the dataset
id2label = {0: "sadness", 1: "joy", 2: "love", 3: "anger", 4: "fear", 5: "surprise"}
# Often commonly called "inputs". Depends on the dataset. This is the input text to the model.
# This field will be called input_ids during tokenization/training/eval.
input_column = "text"
# This is the column name from the dataset which is the target to train on.
# It will get renamed to "label" during tokenization/training/eval.
label_column = "label"
checkpoint = "answerdotai/ModernBERT-base"  # name of the Hugging Face model to fine tune
batch_size = 32  # depends on GPU size and model size
GPU_SIZE = "A100"  # https://modal.com/docs/guide/gpu#specifying-gpu-type
num_train_epochs = 2
learning_rate = 5e-5  # learning rate for the optimizer


# This is the logic for tokenizing the input text. It's used in the dataset map function
# during training and evaluation. Of importance is the max_length parameter which
# you will want to increase for input texts that are longer. Traditionally bert and other encoder
# models have a max length of 512 tokens. But ModernBERT has a max length of 8192 tokens.
def tokenizer_function_logic(example, tokenizer):
    return tokenizer(example[input_column], padding=True, truncation=True, return_tensors="pt", max_length=512)


wandb_project = "hugging_face_training_jobs"  # name of the wandb project to use
pre_fix_name = ""  # optional prefix to the run name to differentiate it from other experiments
# This is a label that gets assigned to any example that is not classified by the model
# according to some probability threshold. It's only used for evaluation.
unknown_label_int = -1
unknown_label_str = "UNKNOWN"
# define the run name which is used in wandb and the model name when saving model checkpoints
run_name = f"{ds_name}-{ds_name_config}-{checkpoint}-{batch_size=}-{learning_rate=}-{num_train_epochs=}"
# ---------------------------------- SETUP END----------------------------------#

if pre_fix_name:
    run_name = f"{pre_fix_name}-{run_name}"

label2id = {v: k for k, v in id2label.items()}
path_to_ds = os.path.join("/data", ds_name, ds_name_config if ds_name_config else "")

load_dotenv(env_file)
app = modal.App("trainer")

# Non Flash-Attn Image
# image = Image.debian_slim(python_version="3.11").run_commands(
#     "apt-get update && apt-get install -y htop git",
#     "pip3 install torch torchvision torchaudio",
#     "pip install git+https://github.com/huggingface/transformers.git datasets accelerate scikit-learn python-dotenv wandb",
#     # f'huggingface-cli login --token {os.environ["HUGGING_FACE_ACCESS_TOKEN"]}',
#     f'wandb login  {os.environ["WANDB_API_KEY"]}',
# )

# Flash-Attn Image
# https://modal.com/docs/guide/cuda#for-more-complex-setups-use-an-officially-supported-cuda-image
cuda_version = "12.4.0"  # should be no greater than host CUDA version
flavor = "devel"  #  includes full CUDA toolkit
operating_sys = "ubuntu22.04"
tag = f"{cuda_version}-{flavor}-{operating_sys}"

image = (
    modal.Image.from_registry(f"nvidia/cuda:{tag}", add_python="3.11")
    .apt_install("git", "htop")
    .pip_install(
        "ninja",  # required to build flash-attn
        "packaging",  # required to build flash-attn
        "wheel",  # required to build flash-attn
        "torch",
        "git+https://github.com/huggingface/transformers.git",
        "datasets",
        "accelerate",
        "scikit-learn",
        "python-dotenv",
        "wandb",
    )
    .run_commands(
        "pip install flash-attn --no-build-isolation",  # add flash-attn
        f'wandb login  {os.environ["WANDB_API_KEY"]}',
    )
)

vol = modal.Volume.from_name("trainer-vol", create_if_missing=True)


@app.cls(
    image=image,
    volumes={"/data": vol},
    secrets=[modal.Secret.from_dotenv(filename=env_file)],
    gpu=GPU_SIZE,
    timeout=60 * 60 * 10,
    container_idle_timeout=300,
)
class Trainer:
    def __init__(self, reload_ds=True):
        import torch

        self.reload_ds = reload_ds
        self.device = torch.device("cuda") if torch.cuda.is_available() else torch.device("cpu")

    @build()
    @enter()
    def setup(self):
        from datasets import load_dataset, load_from_disk
        from transformers import (
            AutoTokenizer,
        )
        from transformers.utils import move_cache

        os.makedirs("/data", exist_ok=True)

        if not os.path.exists(path_to_ds) or self.reload_ds:
            try:
                # clean out the dataset folder
                shutil.rmtree(path_to_ds)
            except FileNotFoundError:
                pass
            self.ds = load_dataset(ds_name, ds_name_config)
            # Save dataset to disk
            self.ds.save_to_disk(path_to_ds)
        else:
            self.ds = load_from_disk(path_to_ds)

        move_cache()

        # Load tokenizer and model
        self.tokenizer = AutoTokenizer.from_pretrained(checkpoint)

    def tokenize_function(self, example):
        return tokenizer_function_logic(example, self.tokenizer)

    def compute_metrics(self, pred):
        """
        To debug this function manually on some sample input in ipython you can create an input
        pred object like this:
        from transformers import EvalPrediction
        import numpy as np
        logits=[[-0.9559,  0.7553],
        [ 2.0987, -2.3868],
        [ 1.0143, -1.1551],
        [ 1.3666, -1.6074]]
        label_ids = [1, 0, 1, 0]
        pred = EvalPrediction(predictions=logits, label_ids=label_ids)
        """
        import numpy as np
        import torch
        from sklearn.metrics import f1_score

        # pred is EvalPrediction object i.e. from transformers import EvalPrediction
        logits = torch.tensor(pred.predictions)  # raw prediction logits from the model
        label_ids = pred.label_ids  # integer label ids classes
        labels = torch.tensor(label_ids).double().numpy()

        probs = logits.softmax(dim=-1).float().numpy()  # probabilities for each class
        preds = np.argmax(probs, axis=1)  # take the label with the highest probability
        f1_micro = f1_score(labels, preds, average="micro", zero_division=True)
        f1_macro = f1_score(labels, preds, average="macro", zero_division=True)
        return {"f1_micro": f1_micro, "f1_macro": f1_macro}

    @modal.method()
    def train_model(self):
        import wandb
        import torch
        import os
        from datasets import load_from_disk
        from transformers import (
            AutoConfig,
            AutoModelForSequenceClassification,
            DataCollatorWithPadding,
            Trainer,
            TrainingArguments,
        )

        os.environ["WANDB_PROJECT"] = wandb_project
        # Remove previous training model saves if exists for same run_name
        try:
            shutil.rmtree(os.path.join("/data", run_name))
        except FileNotFoundError:
            pass

        ds = load_from_disk(path_to_ds)
        # useful for debugging and quick training: Just downsample the dataset
        # for split in ds.keys():
        #     ds[split] = ds[split].shuffle(seed=42).select(range(1000))
        num_labels = len(id2label)
        tokenized_dataset = ds.map(self.tokenize_function, batched=True)
        if label_column != "label":
            tokenized_dataset = tokenized_dataset.rename_column(label_column, "label")
        data_collator = DataCollatorWithPadding(tokenizer=self.tokenizer)

        # https://www.philschmid.de/getting-started-pytorch-2-0-transformers
        # https://www.philschmid.de/fine-tune-modern-bert-in-2025
        training_args = TrainingArguments(
            output_dir=os.path.join("/data", run_name),
            num_train_epochs=num_train_epochs,
            learning_rate=learning_rate,
            per_device_train_batch_size=batch_size,
            per_device_eval_batch_size=batch_size,
            # PyTorch 2.0 specifics
            bf16=True,  # bfloat16 training
            # torch_compile=True,  # optimizations but its making it slower with my code and causes errors when running with flash-attn
            optim="adamw_torch_fused",  # improved optimizer
            # logging & evaluation strategies
            logging_dir=os.path.join("/data", run_name, "logs"),
            logging_strategy="steps",
            logging_steps=200,
            eval_strategy="epoch",
            save_strategy="epoch",
            load_best_model_at_end=True,
            metric_for_best_model="f1_macro",
            report_to="wandb",
            run_name=run_name,
        )

        configuration = AutoConfig.from_pretrained(checkpoint)
        # these dropout values are noted here in case we want to tweak them in future
        # experiments.
        # configuration.hidden_dropout_prob = 0.1  # 0.1 is default
        # configuration.attention_probs_dropout_prob = 0.1  # 0.1 is default
        # configuration.classifier_dropout = None  # If None then defaults to hidden_dropout_prob
        configuration.id2label = id2label
        configuration.label2id = label2id
        configuration.num_labels = num_labels
        model = AutoModelForSequenceClassification.from_pretrained(
            checkpoint,
            config=configuration,
            # TODO: Is this how to use flash-attn 2?
            # attn_implementation="flash_attention_2",
            # torch_dtype=torch.bfloat16,
        )

        trainer = Trainer(
            model,
            training_args,
            train_dataset=tokenized_dataset[train_split],
            eval_dataset=tokenized_dataset[validation_split],
            data_collator=data_collator,
            tokenizer=self.tokenizer,
            compute_metrics=self.compute_metrics,
        )

        trainer.train()

        # Log the trainer script
        wandb.save(__file__)

    def load_model(self, check_point):
        from transformers import AutoModelForSequenceClassification, AutoTokenizer
        import torch

        model = AutoModelForSequenceClassification.from_pretrained(
            check_point,
            # TODO: Is this how to use flash-attn 2?
            # attn_implementation="flash_attention_2",
            # torch_dtype=torch.bfloat16,
        )
        tokenizer = AutoTokenizer.from_pretrained(check_point)
        return tokenizer, model

    @modal.method()
    def eval_model(self, check_point=None, split=validation_split):
        import os
        import numpy as np
        import pandas as pd
        import torch
        import wandb
        from datasets import load_from_disk
        from sklearn.metrics import classification_report

        os.environ["WANDB_PROJECT"] = wandb_project
        if check_point is None:
            # Will use most recent checkpoint by default. It may not be the "best" checkpoint/model.
            check_points = sorted(
                os.listdir(os.path.join("/data/", run_name)), key=lambda x: int(x.split("-")[1]) if x.startswith("checkpoint-") else 0
            )
            check_point = os.path.join("/data", run_name, check_points[-1])
        print(f"Evaluating Checkpoint {check_point}, split {split}")

        tokenizer, model = self.load_model(check_point)

        def tokenize_function(example):
            return tokenizer_function_logic(example, tokenizer)

        model.to(self.device)
        test_ds = load_from_disk(path_to_ds)[split]

        test_ds = test_ds.map(tokenize_function, batched=True, batch_size=batch_size)
        if label_column != "label":
            test_ds = test_ds.rename_column(label_column, "label")

        def forward_pass(batch):
            """
            To debug this function manually on some sample input in ipython, take your dataset
            that has already been tokenized and create a batch object with this code:
            batch_size = 32
            test_ds.set_format('torch', columns=['input_ids', 'attention_mask', 'label'])
            small_ds = test_ds.take(batch_size)
            batch = {k: torch.stack([example[k] for example in small_ds]) for k in small_ds[0].keys()}
            """
            inputs = {k: v.to(self.device) for k, v in batch.items() if k in tokenizer.model_input_names}
            with torch.no_grad():
                output = model(**inputs)
                probs = torch.softmax(output.logits, dim=-1).round(decimals=2)
                probs = probs.float()  # convert to float32 only for numpy compatibility. # TODO: Related to using flash-attn 2
            return {"probs": probs.cpu().numpy()}

        test_ds.set_format("torch", columns=["input_ids", "attention_mask", "label"])
        test_ds = test_ds.map(forward_pass, batched=True, batch_size=batch_size)

        test_ds.set_format("pandas")
        df_test = test_ds[:]

        def pred_label(probs, threshold):
            # probs is a list of probabilities for one row of the dataframe
            probs = np.array(probs)
            max_prob = np.max(probs)
            predicted_class = np.argmax(probs)

            if max_prob < threshold:
                return unknown_label_int

            return predicted_class

        for threshold in [0, 0.1, 0.2, 0.3, 0.4, 0.5, 0.6, 0.7, 0.8, 0.9]:
            print("-" * 60)
            print(f"{threshold=}\n")
            df_test[f"pred_label"] = df_test["probs"].apply(pred_label, args=(threshold,))
            print(f"Coverage Rate:\n")
            predictions_mapped = df_test[f"pred_label"].map({**id2label, unknown_label_int: unknown_label_str})
            print("Raw counts:")
            print(predictions_mapped.value_counts())
            print("\nProportions:\n")
            print(predictions_mapped.value_counts(normalize=True))
            print(f"\nConditional metrics (classification report on predicted subset != {unknown_label_str})")
            mask = df_test[f"pred_label"] != unknown_label_int
            y = np.array([x for x in df_test[mask]["label"].values])
            y_pred = np.array([x for x in df_test[mask][f"pred_label"].values])
            report = classification_report(
                y,
                y_pred,
                target_names=[k for k, v in sorted(label2id.items(), key=lambda item: item[1])],
                digits=2,
                zero_division=0,
                output_dict=False,
                labels=sorted(list(range(len(id2label)))),
            )
            print(report)
            # --- Overall Accuracy (count "Unknown" as incorrect) ---
            # If ground truth is never 'unknown_label_int', then any prediction of "Unknown" is automatically wrong.
            overall_acc = (df_test["label"] == df_test[f"pred_label"]).mean()
            print(f"Overall Accuracy (counting '{unknown_label_str}' as wrong): {overall_acc:.2%}")
            print("-" * 60)

        print("Probability Distribution Max Probability Across All Classes")
        print(pd.DataFrame([max(x) for x in df_test["probs"]]).describe())
        # Ensure wandb is finished
        wandb.finish()


@app.local_entrypoint()
def main():
    trainer = Trainer(reload_ds=True)

    print(f"Training {run_name}")
    trainer.train_model.remote()

    # Will use most recent checkpoint by default. It may not be the "best" checkpoint/model.
    # Write the full path to the checkpoint here if you want to evaluate a specific model.
    # For example: check_point = '/data/run_name/checkpoint-1234/'
    check_point = None
    trainer.eval_model.remote(
        check_point=check_point,
        split=validation_split,
    )

Run The Trainer

All of these training runs can be executed from the command line by running modal run trainer.py after making minor edits to the trainer.py file. You can even run them all in parallel, because Modal will take care of spinning up the containers and running the code!

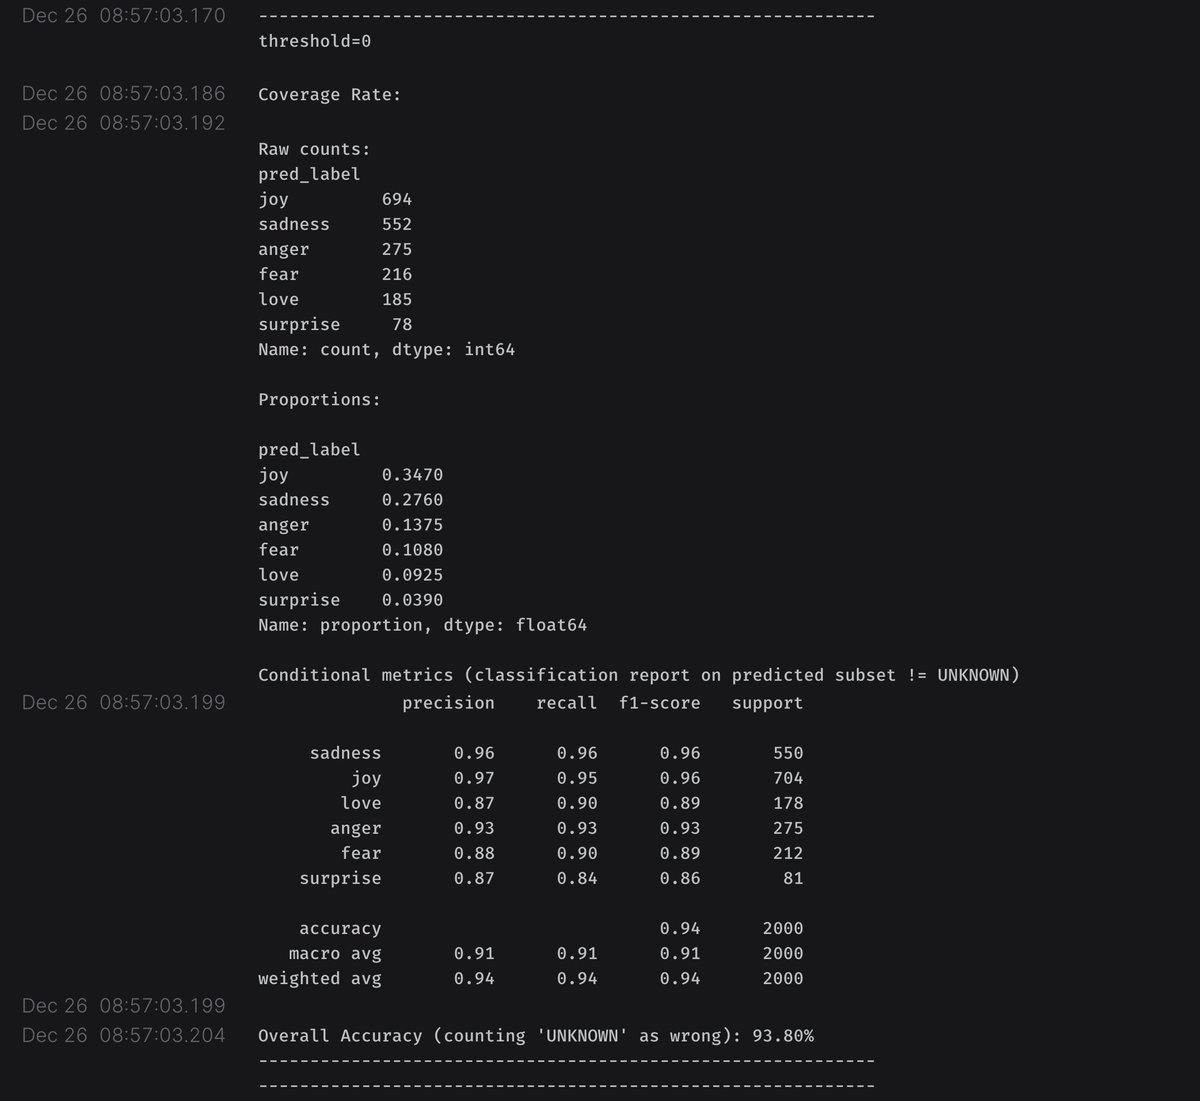
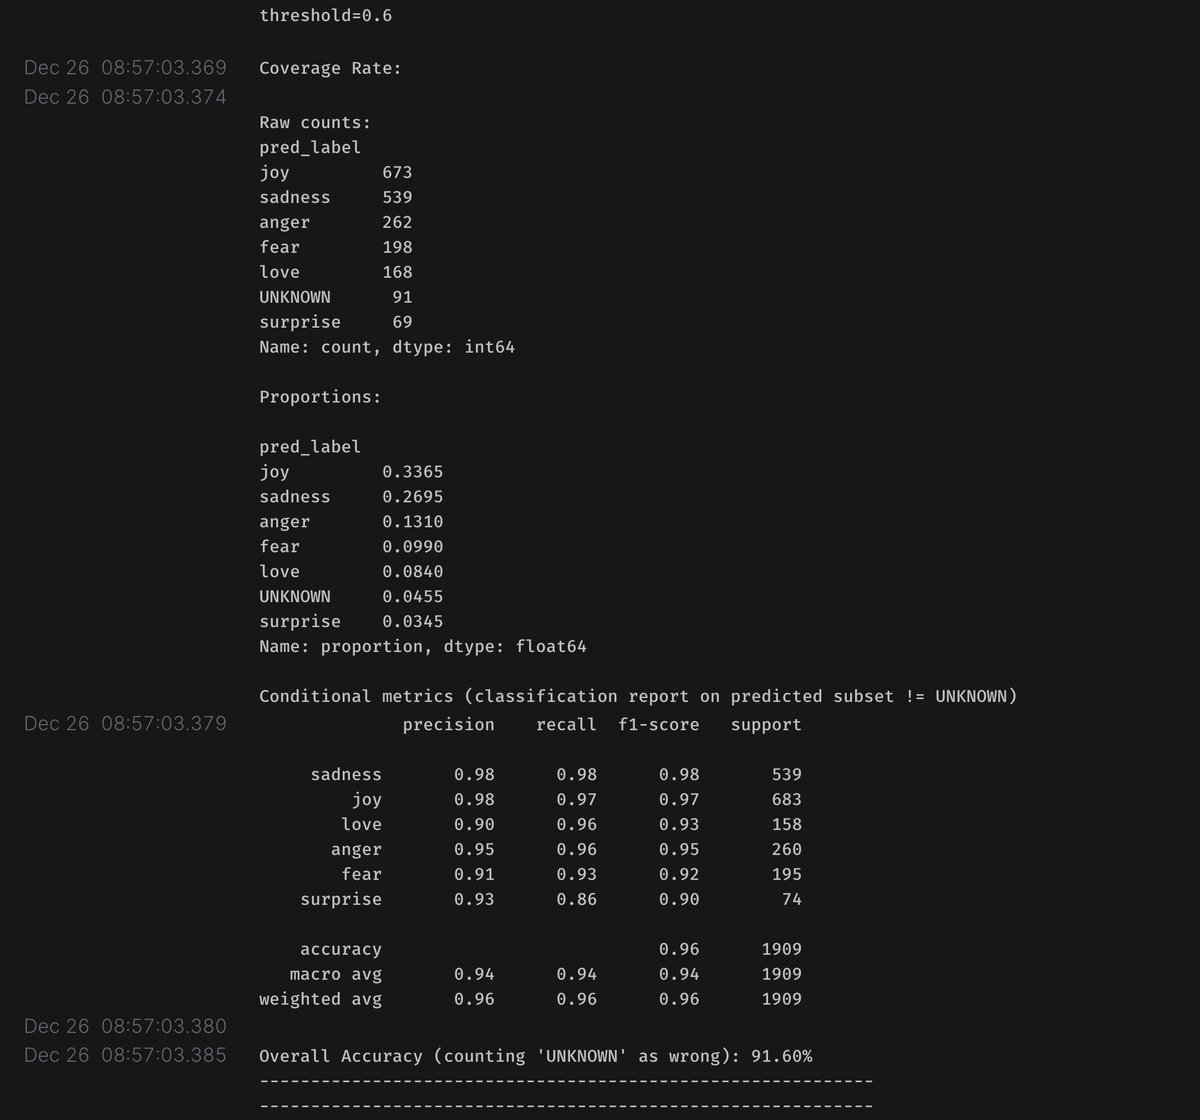
Here are some random screen shots from the Modal UI dashboard showing containers, GPU metrics, volumes for storing datasets and checkpoints, and log outputs.

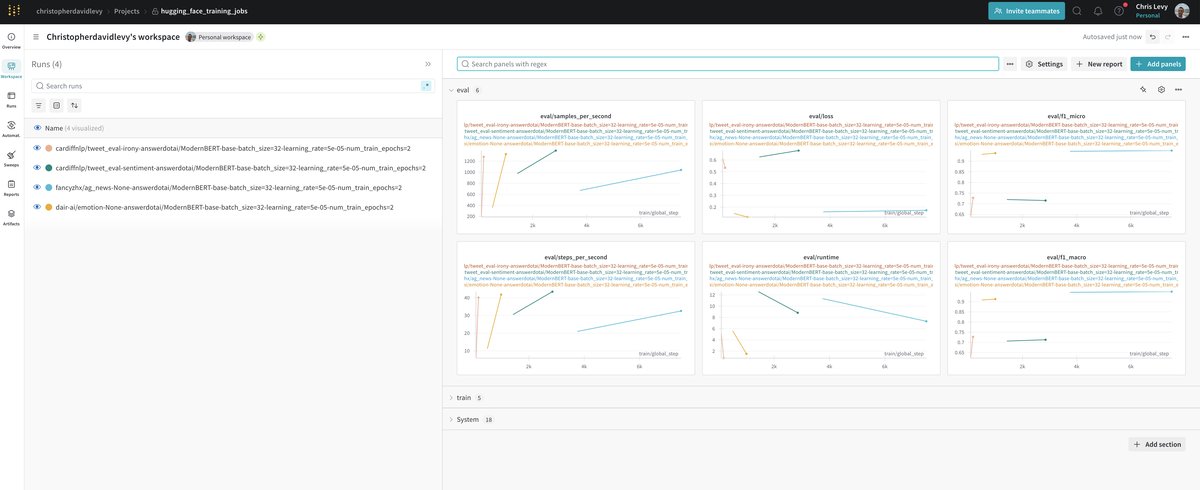
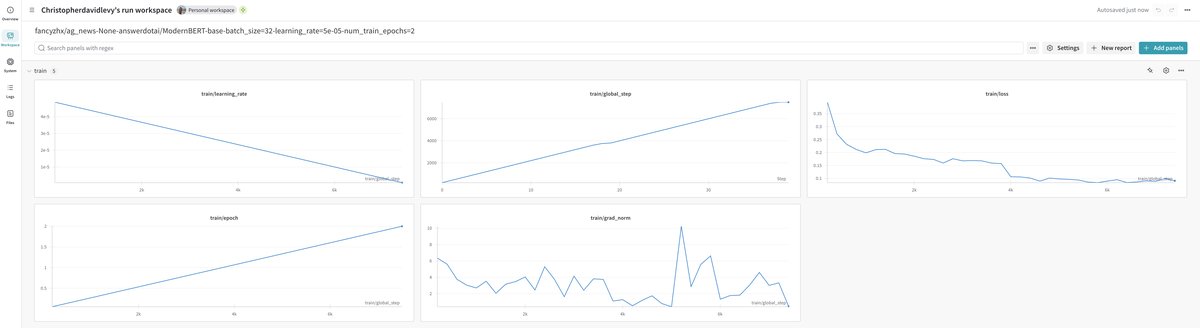
Here are some screen shots from the wandb dashboard. There are public wandb runs for each of the training runs below.

Emotion Dataset

By default the trainer will use the "dair-ai/emotion" dataset which predicts the emotion of a text.

modal run --detach trainer.py

AG News Dataset

You can easily switch to a different dataset, in this case I used the "fancyzhx/ag_news" dataset. All I switched in the trainer.py file were these lines:

ds_name = "fancyzhx/ag_news" 
id2label = {0: "World", 1: "Sports", 2: "Business", 3: "Sci/Tech"}
validation_split = "test"
modal run --detach trainer.py

TweetEval Dataset

Sentiment

Make these edits to the trainer.py file:

ds_name = "cardiffnlp/tweet_eval"
ds_name_config = "sentiment" 
id2label = {0: "negative", 1: "neutral", 2: "positive"}
modal run --detach trainer.py

Irony

Make these edits to the trainer.py file:

ds_name = "cardiffnlp/tweet_eval"
ds_name_config = "irony" 
id2label = {0: 'non_irony', 1: 'irony'}
modal run --detach trainer.py

Yahoo Answers Topics

Make these edits to the trainer.py file:

ds_name = "community-datasets/yahoo_answers_topics"
id2label = {
    0: "Society & Culture",
    1: "Science & Mathematics",
    2: "Health",
    3: "Education & Reference",
    4: "Computers & Internet",
    5: "Sports",
    6: "Business & Finance",
    7: "Entertainment & Music",
    8: "Family & Relationships",
    9: "Politics & Government",
}
validation_split = "test"
input_column = 'question_title'
label_column = 'topic'
modal run --detach trainer.py

Synthetic Dataset With Longer Texts

To test out the longer context window of ModernBERT, I created a synthetic dataset with longer texts. These texts consists of synthetic social media posts. For each row in the dataset there is a list of input tweets concatenated together and a corresponding label. I made this dataset using various LLMS such as gpt-4o-mini, claude-3-5-sonnet-20241022, gemini-2.0-flash-exp, and deepseek-chat-v3. The prompts for creating the dataset are in the prompts.py file which can be found here. The system prompt was also crafted mostly by an LLM and I made some minor edits to it. The dataset is just a toy dataset and should not be used for anything serious. It probably has issues since I hacked it together rather quickly.

I uploaded the dataset to the Hugging Face Hub and you can find it here.

To run the trainer on this dataset make these edits to the trainer.py file:

# I changed the tokenizer function to use a max length of 3000 tokens
def tokenizer_function_logic(example, tokenizer):
    return tokenizer(example[input_column], padding=True, truncation=True, return_tensors="pt", max_length=3000)


ds_name = "chrislevy/synthetic_social_persona_tweets"
id2label = {0: 'Tech Industry Analysis', 1: 'Software Engineering', 2: 'Frontend Development', 3: 'Data Analytics', 4: 'AI & Machine Learning', 5: 'Cybersecurity News', 6: 'Cryptocurrency & Web3', 7: 'Web3 Innovation', 8: 'NFT Trading', 9: 'Startup Ecosystem', 10: 'Venture Capital Analysis', 11: 'Paid Advertising', 12: 'Content Marketing', 13: 'Ecommerce Innovation', 14: 'Business Leadership', 15: 'Product Management', 16: 'Fintech Discussion', 17: 'Sales Strategy', 18: 'Tech Entrepreneurship', 19: 'US Politics Analysis', 20: 'Global Affairs Commentary', 21: 'Electoral Politics', 22: 'Political Commentary', 23: 'Legal System Analysis', 24: 'Military & Defense', 25: 'Climate Change Discussion', 26: 'Economic Policy', 27: 'Political Satire', 28: 'Local Community News', 29: 'Film & Cinema Analysis', 30: 'TV Series Discussion', 31: 'Reality TV Commentary', 32: 'Music Industry Analysis', 33: 'Video Content Creation', 34: 'Video Game Enthusiast', 35: 'Competitive Gaming', 36: 'Indie Game Dev', 37: 'Anime & Manga Community', 38: 'Comics & Graphic Novels', 39: 'Celebrity Commentary', 40: 'Fashion & Streetwear', 41: 'Sneaker Culture', 42: 'Book & Literature', 43: 'Podcast Creation', 44: 'Entertainment Industry', 45: 'Live Music Fan', 46: 'NFL Analysis', 47: 'NBA Discussion', 48: 'MLB Commentary', 49: 'Soccer Coverage', 50: 'Formula 1 Community', 51: 'College Sports Analysis', 52: 'MMA & Boxing', 53: 'Weightlifting Training', 54: 'Fitness Training', 55: 'Endurance Sports', 56: 'Sports Betting', 57: 'Olympics Coverage', 58: 'Space Exploration', 59: 'Biology Research', 60: 'Physics Discussion', 61: 'Health & Medicine', 62: 'EdTech Innovation', 63: 'Historical Analysis', 64: 'Psychology Research', 65: 'Environmental Science', 66: 'Earth Sciences', 67: 'Academic Research', 68: 'Travel Photography', 69: 'Food & Cooking', 70: 'Professional Photography', 71: 'Amateur Photography', 72: 'Home Improvement', 73: 'Home Gardening', 74: 'Investment Strategy', 75: 'Personal Investing', 76: 'Pet Community', 77: 'Meditation Practice', 78: 'Digital Art', 79: 'Visual Arts', 80: 'Automotive Culture', 81: 'Craft Beer Culture', 82: 'Coffee Enthusiasm', 83: 'Culinary Arts', 84: 'Parenting Discussion', 85: 'Mental Health Support', 86: 'Spiritual Practice', 87: 'Philosophy Discussion', 88: 'Urban Culture', 89: 'Vintage Collection', 90: 'DIY Crafts', 91: 'Language Learning', 92: 'Open Source Coding', 93: 'Personal Development', 94: 'Minimalist Living', 95: 'Sustainable Living', 96: 'Fiction Writing', 97: 'Conspiracy Theories', 98: 'Fan Culture', 99: 'Internet Culture', 100: 'Outdoor Adventure', 101: 'Alternative Lifestyle', 102: 'Twitter Meta Commentary', 103: 'Meme Creation', 104: 'Viral Content', 105: 'Personal Updates', 106: 'Social Commentary', 107: 'Community Building', 108: 'Twitter Spaces Hosting', 109: 'Platform Critique', 110: 'Bot & Automation', 111: 'Online Privacy', 112: 'Data Visualization'}

I also changed the logging steps for this run only logging_steps=20,.

modal run --detach trainer.py

Conclusion

I hope this code can start as a launching point for your own fine-tuning experiments with encoder models and ModernBERT. If you were not familiar with Modal, I hope this shows you how easy it is to get started. I think minor changes may be needed to get this training with flash attention 2. You will see some commented out parts of my code with regards to choosing attn_implementation="flash_attention_2". I'm not sure if that is needed or not. I think I am installing the flash attention 2 package but I'm not sure if it's being used during training. If anyone knows, hit up on X. I did try running different variations but couldn't really see how to tell if it was all running properly or not.

Resources

Announcement from Jeremy Howard on X

Blog Post on Hugging Face

Modal

Fine-tune classifier with ModernBERT in 2025 Blog by Philipp Schmid