The Basics of Server-Sent Events (SSE) with FastHTML
Intro
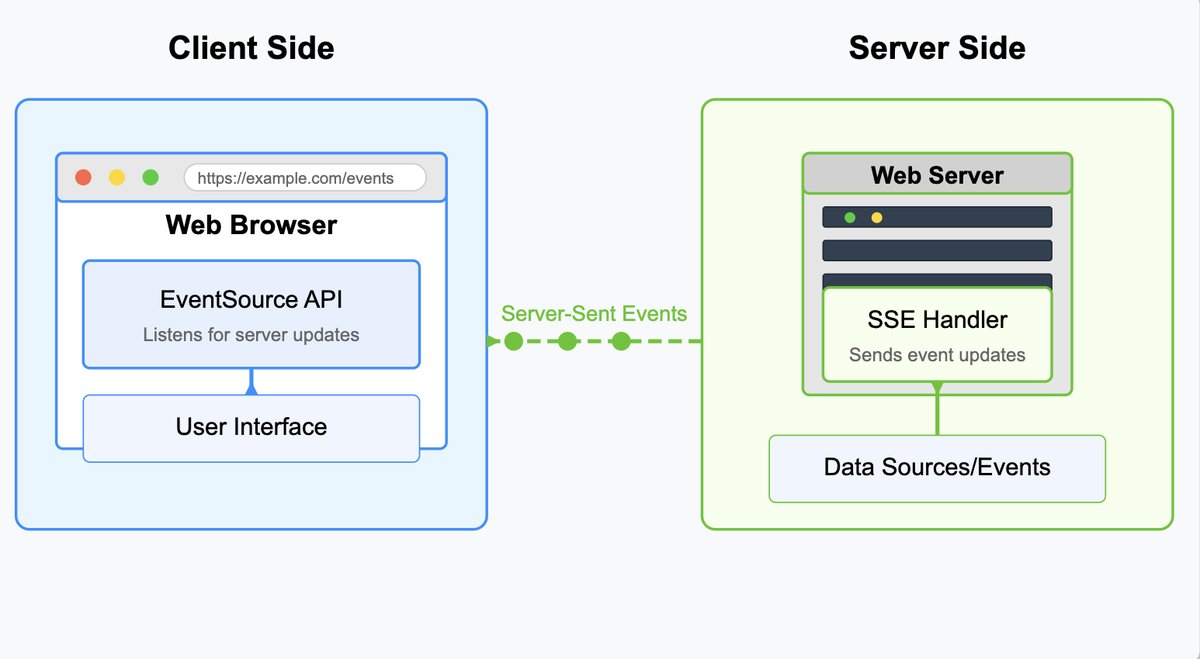
Server-Sent Events (SSE) are a web technology that allow servers to push real-time updates to web clients over a single HTTP connection. Unlike traditional HTTP requests where the client must repeatedly ask for new data, SSE creates a one-way channel from the server to the client that stays open, allowing the server to send updates whenever they're available.
In this blog post, I will go through some examples of how to use SSE in FastHTML. FastHTML is a new web framework for building web applications with minimal compact code, and completely in Python! It would certainly help to have run some examples of FastHTML before reading this post. Some familiarity with htmx is also useful. The htmx.org website has a great explanation of how to use the htmx Server Sent Event (SSE) extension. MonsterUI is a library of components built on top of FastHTML. It will also be used in the examples below. Both FastHTML and MonsterUI are developed by Answer AI.
I wrote this post to help myself understand SSE in FastHTML and to share what I learned. It's not meant to be a comprehensive guide. Rather, it's a collection of examples that I hope will be helpful for myself to refer back to as I continue to learn more about FastHTML and SSE and work on personal projects.
Follow Along with the Code
If you want to try some of the examples yourself, you can copy any of the examples into a file called main.py and run it with python main.py. You will need to have FastHTML and MonsterUI installed. You can install them with
pip install python-fasthtml monsterui
There is only one example that requires more than this, example 7. This example requires the Google Gen AI SDK to be installed. You can install it with
pip install google-genai
You would also need an API key which you can get here for free.
Example 1: Basic SSE Implementation
Let's look at a basic example first to see how SSE works. In this example an SSE connection is setup when the page is loaded.
Breaking Down The Example in Details
Initial Page Load
When a user navigates to the root URL, the browser sends a GET request to the server.
The server responds with the HTML generated by the index() function, which creates:
-
A container with a heading "Intro SSE Example".
-
A div with ID "sse-content" containing an introductory paragraph. This div has several HTMX attributes that configure SSE behavior.
-
The browser renders this initial HTML, showing the heading and the introductory paragraph.
SSE Connection Establishment
The browser sees the hx_ext="sse" and sse_connect="/sse-stream" attributes on the div and recognizes that it needs to establish a Server-Sent Events connection.
The browser automatically opens an EventSource connection to the /sse-stream endpoint.
On the server, when this connection request arrives, it triggers the sse_stream() function, which:
- Creates a new instance of the
message_generator()coroutine - Wraps it in an
EventStreamresponse object - Sends the appropriate HTTP headers to establish an SSE connection
Message Streaming Process
Once the connection is established, the message_generator() coroutine begins execution:
For each iteration (0-9):
- It creates an HTML message containing "message number {i}"
- Converts this to SSE format with the event name "EventName"
- Yields this message, which is immediately sent to the browser
- Pauses for 0.5 seconds using
await sleep(0.5) - During this pause, the server can handle other requests because of the use of
async
After the 10 numbered messages, it sends a final message containing "DONE".
Client-Side Processing
As each SSE message arrives at the browser, HTMX intercepts it because of the hx_ext="sse" attribute.
It checks the event name in the message ("EventName") and matches it against the sse_swap="EventName" attribute.
Since they match, HTMX processes this message
The content of each message is inserted into the div according to the hx_swap="beforeend show:bottom" attribute:
beforeend: Each new message is added at the end of the existing contentshow:bottom: The page automatically scrolls to show the new content
The user sees each message appear approximately every half second, with the page scrolling to keep the latest message visible.
Connection Behavior After Completion
After the final "DONE" message, the generator is exhausted, but the SSE connection doesn't automatically close.
The browser's EventSource implementation will detect the end of the stream and automatically attempt to reconnect after a brief delay.
This reconnection will trigger another call to sse_stream(), creating a new instance of message_generator(), and the sequence will start over.
This cycle will continue indefinitely, with the div accumulating more and more messages, unless the page is navigated away from or the connection is explicitly closed.
This was a surprise to me when first learning about SSE. I expected the connection to close after the initial for loop completed.
Example 2: How to Start SSE with Button Click
Example 2a: Not quite what I wanted
Next I wanted to show how to start a SSE connection with a button click. The first thing I tried didn't do completely what I wanted. So this example shows how NOT to do it. It's still a learning opportunity worth documenting.
It's the same code as in Example 1 with the following changes:
- Add a form around a button and put the SSE connection attributes on the button.
In this example, the SSE stream starts before the button is clicked because of how the HTMX SSE extension works with the attributes on the button. The key issue is that the SSE connection attributes are directly on the button element:
Button(
    "Start SSE",
    hx_ext="sse",
    sse_swap="EventName",
    sse_connect="/sse-stream",
    hx_swap="beforeend show:bottom",
    hx_target="#sse-content",  # This is the target element that will receive the SSE messages
)
With this configuration, the SSE connection is established immediately when the page is loaded because:
- The HTMX SSE extension is loaded (
hx_ext="sse"). - The
sse_connectattribute is present. - When both of these conditions are met, HTMX automatically initiates the SSE connection.
This was not quite what I was going for. Clicking the button does start a new SSE connection, however my plan was to start the SSE connection only when the button is clicked, not on the initial page load. In the next example I show one way of doing this.
Example 2b: Start SSE with Button Click (Not Page Load)
The main difference in this example is that
SSE connection attributes are not on the main page which loads first.
Instead, when we click the button, we trigger a GET request to a new endpoint, /start-sse.
This endpoint returns a div with the SSE connection attributes, hence creating the initial SSE connection.
It will replace the existing div with same id sse-content. The HTMX SSE connection is established and messages are streamed to the client.
Note that after the SSE connection is established, it stays open and the messages are streamed to the client indefinitely as in the previous examples.
Example 3: Closing The SSE Connection Gracefully
In some cases you may want to close the SSE connection gracefully when a specific message is received.
You can use the sse_close attribute in this case.
This next example is the same as Example 2b but we add a special message to close the connection.
The only difference from the previous example is the two lines of code which are both commented on below.
Example 4: Receiving Multiple Events
You can also listen to multiple events from a single EventSource. The listeners can be either:
- the same element that contains the
hx_extandsse_connectattributes - or child elements of the element containing the
hx_extandsse_connectattributes
Example 4a: Multiple Listeners on the Same Element
Example 4b: Multiple Listeners on Child Elements
Example 5: Trigger Server Callbacks with hx_trigger example
Example 5a: Reminder of the hx_trigger attribute in HTMX
In HTMX, the hx_trigger attribute specifies which event should trigger an HTTP request.
By default, elements use their "natural" events:
- Forms trigger on submit
- Inputs, selects, and textareas trigger on change
- Everything else triggers on click
However, hx_trigger allows you to override this default behavior and specify a different event or set of conditions.
Here is a straight forward example showing how hx_trigger works (not with SSE).
Example 5b: hx_trigger with Server-Sent Events (SSE)
When used with Server-Sent Events, hx_trigger takes on a different and powerful role.
Instead of listening for browser DOM events, it listens for named events coming from the SSE stream.
For SSE events, the syntax is different. It becomes:
hx_trigger="sse:EventName"
Where EventName is the name of the event sent from the server.
- The element with
hx_trigger="sse:EventName"doesn't need to have the SSE connection itself - It just needs to be inside an element that has established the SSE connection (with
hx_ext="sse"andsse_connect) - When an event with the matching name arrives through the SSE connection, it triggers the HTTP request specified by other HTMX attributes (
hx_get,hx_post, etc.) - Instead of waiting for DOM events, it listens for messages from the server (The server decides when to trigger client-side HTTP requests).
Let's look at an example.
Example 6: Example from the FastHTML Documentation - Random Number Generator
As of writing this blog post, this is an example straight from the FastHTML Documentation. It is essentially copy and pasted.
The reason I did not start with this example is because this example always confused me a little bit when first encountering it.
I was confused by the role of the while loop and why messages kept coming through, even if the while loop was removed.
However, after doing some reading and working through the above examples, it all makes sense to me now.
Example 6a: No While Loop
In this first example I remove the while loop and the shutdown_event = signal_shutdown().
Remember, that even without the while loop, the numbers will keep coming.
This is because the SSE connection automatically attempts to reconnect after a brief delay.
This means the endpoint "/number-stream" will keep being called and the numbers will keep coming.
Example 6b: With While Loop
In this example I add the while loop and the shutdown_event = signal_shutdown() back in.
This means the endpoint "/number-stream" will only be called once, but the numbers will keep coming much faster than before.
The while not shutdown_event.is_set(): loop will continue generating random numbers and sending them as SSE messages until the server starts shutting down. When a shutdown signal is received, the event is set, the loop exits, and the generator stops producing new values.
Example 7: Streaming Text from an LLM and Thoughts on Rendering Markdown
This example could be useful in implementing a chat bot. We will not build a back and forth chat bot here, but rather a one way chat where the user types in a a single message and the LLM responds with a stream of text. We will make use of Google's Gemini Flash 2.0 model via the Google Gen AI SDK
The idea I want to focus on here is how to render the markdown from the LLM response as it streams in. As of writing this blog post, I still don't have a solid solution that I think is efficient.
Example 7a: Streaming Text from an LLM With No Rendering
This example is nice because it's efficient. The LLM response is streamed as the chunks of text become available. The issue with it is that the markdown is not rendered. It just shows up as plain text.
Example 7b: Streaming Text from an LLM With Rendering (Not Efficient)
You may think it's as simple as the small change
yield sse_message(render_md(chunk) event="EventName")
The issue with this is that the markdown is rendered for each chunk of text, and a chunk
may not be complete markdown. For example a chunk may be the text **Hello and the next
chunk may be world**. So the markdown will not render correctly. It will all be a jumble.
One solution that does work, but is not efficient, is to take example 7a and change the following two things:
yield sse_message(render_md(final_message), event="EventName")- change the
hx_swap="beforeend show:bottom"tohx_swap="innerHTML"in the functionsend_message.
This works, but is not efficient because instead of streaming one smaller chunk at a time,
it streams the entire full message every time. And the full_message just keeps getting longer and longer
as we add more and more chunks to it.
I would like to spend more time to figure out a more efficient solution. You can see there is also a bit of "jankiness" each time formulas and code blocks are rerendered. My goal would be to mimick what OpenAI and Anthropic do with streaming, and only have small chunks of text in the message come through the SSE connection. All while rendering the markdown correctly in real time and having everything look nice. Maybe I will put some more thought into this and update the blog post with a more efficient solution in the near future.
Conclusion and Recap of Main Attributes for Server Sent Events in FastHTML
Here's a quick summary of what we learned:
hx_ext="sse"- This is required to use the SSE extension.sse_connect="<url>"- The URL of the SSE endpointsse_swap="<message-name>"- The name of the message to swap into the DOM.sse_swap="event_name1,event_name2"- To listen for multiple message types on a single element.hx_trigger="sse:<message-name>"- SSE messages can also trigger HTTP callbacks using thehx_triggerattribute.sse_close=<message-name>- To close theEventStreamgracefully when that message is received. This might be helpful if you want to send information to a client that will eventually stop.hx_swap="beforeend show:bottom"- While not specific to SSE, this is commonly used with SSE to control how content is inserted (append at the end) and handled (scroll to show the new content).hx_target="#element-id"- Specifies where the SSE message content should be inserted (if not the element itself).- On the server side, remember the key function:
sse_message(element, event="message")- Converts an FT component into the format required for SSE, with an optional event name (defaults to "message").